一、准备工作
上pkgs.org下载rmpforge。rpmforge是一个第三方yum源。
选择相应的版本下载安装。
// 安装成功后,清空yum list 并 重新获取
[root@pangou Desktop]# yum clean all
Loaded plugins: fastestmirror, refresh-packagekit, security
Cleaning repos: base extras rpmforge updates
Cleaning up Everything
Cleaning up list of fastest mirrors
[root@pangou Desktop]# yum -y list
Loaded plugins: fastestmirror, refresh-packagekit, security
Determining fastest mirrors
// ......
卸载已存在的apache服务和php
[root@pangou Desktop]# yum remove httpd php*
安装development Tools
[root@pangou Desktop]# yum -y groupinstall "Development Tools"
二、安装nginx
创建nginx目录,下载nginx,并解压缩
[root@pangou Downloads]# mkdir nginx
[root@pangou Downloads]# cd nginx/
[root@pangou nginx]# pwd
/root/Downloads/nginx
[root@pangou nginx]# wget http://nginx.org/download/nginx-1.4.0.tar.gz
--2013-04-30 23:13:44-- http://nginx.org/download/nginx-1.4.0.tar.gz
Resolving nginx.org... 206.251.255.63
Connecting to nginx.org|206.251.255.63|:80... connected.
HTTP request sent, awaiting response... 200 OK
Length: 773451 (755K) [application/octet-stream]
Saving to: “nginx-1.4.0.tar.gz”
100%[================================================================>] 773,451 184K/s in 4.5s
2013-04-30 23:13:48 (166 KB/s) - “nginx-1.4.0.tar.gz” saved [773451/773451]
[root@pangou nginx]# ls
nginx-1.4.0.tar.gz
[root@pangou nginx]# tar -zxvf nginx-1.4.0.tar.gz
[root@pangou nginx]# ls
nginx-1.4.0 nginx-1.4.0.tar.gz
编译安装nginx
// 编译 安装路径/opt/nginx
[root@pangou nginx-1.4.0]# ./configure --prefix=/opt/nginx/
编译中如出现报错如:
./configure: error: the HTTP rewrite module requires the PCRE library.
You can either disable the module by using --without-http_rewrite_module
option, or install the PCRE library into the system, or build the PCRE library
statically from the source with nginx by using --with-pcre= option.
就是用yum自行结局依赖关系
[root@pangou nginx-1.4.0]# yum install pcre pcre-devel
然后重新上面的编译
// 编译 安装路径/opt/nginx
[root@pangou nginx-1.4.0]# ./configure --prefix=/opt/nginx/
// 编译成功后
[root@pangou nginx-1.4.0]# make && make install
// 最后安装完成
启动nginx服务
[root@pangou nginx]# cd /opt/nginx/sbin/
[root@pangou sbin]# ./nginx
访问127.0.0.1

服务启动成功。
三、安装php
创建文件夹php,下载php,并解压缩
[root@pangou nginx-1.4.0]# cd /root/Downloads/
[root@pangou Downloads]# mkdir php
[root@pangou Downloads]# cd php/
[root@pangou php]# pwd
/root/Downloads/php
// 下载
[root@pangou php]# wget http://cn2.php.net/get/php-5.4.14.tar.gz/from/this/mirror
// 解压
[root@pangou php]# tar -zxvf php-5.4.14.tar.gz
安装依赖包
[root@pangou php]# yum install -y libxml2-devel libjpeg-devel libpng-devel freetype-devel openssl-devel libcurl-devel libmcrypt-devel
编译php
[root@pangou php]# ls
php-5.4.14 php-5.4.14.tar.gz
[root@pangou php]# cd php-5.4.14
[root@pangou php-5.4.14]# pwd
/root/Downloads/php/php-5.4.14
[root@pangou php-5.4.14]# ls
acinclude.m4 CREDITS ltmain.sh NEWS README.MAILINGLIST_RULES README.TESTING stamp-h.in
aclocal.m4 ext main pear README.namespaces README.TESTING2 stub.c
build EXTENSIONS makedist php5.spec.in README.NEW-OUTPUT-API README.UNIX-BUILD-SYSTEM svnclean.bat
buildconf footer Makefile.frag php.gif README.PARAMETER_PARSING_API README.WIN32-BUILD-SYSTEM tests
buildconf.bat generated_lists Makefile.gcov php.ini-development README.PHP4-TO-PHP5-THIN-CHANGES run-tests.php TSRM
CODING_STANDARDS genfiles Makefile.global php.ini-production README.REDIST.BINS sapi UPGRADING
config.guess header makerpm README.EXTENSIONS README.RELEASE_PROCESS scripts UPGRADING.INTERNALS
config.sub INSTALL missing README.EXT_SKEL README.SELF-CONTAINED-EXTENSIONS server-tests-config.php vcsclean
configure install-sh mkinstalldirs README.GIT-RULES README.STREAMS server-tests.php win32
configure.in LICENSE netware README.input_filter README.SUBMITTING_PATCH snapshot Zend
[root@pangou php-5.4.14]# ./configure --prefix=/opt/php --with-config-file-path=/opt/php/etc --with-mysql=/usr/ --with-mysqli=/usr/bin/mysql_config --with-iconv-dir --with-freetype-dir --with-jpeg-dir --with-png-dir --with-zlib --with-libxml-dir=/usr --enable-xml --disable-rpath --enable-discard-path --enable-magic-quotes --enable-safe-mode --enable-bcmath --enable-shmop --enable-sysvsem --enable-inline-optimization --with-curl --with-curlwrappers --enable-mbregex --enable-fastcgi --enable-fpm --enable-force-cgi-redirect --enable-mbstring --with-mcrypt --enable-ftp --with-gd --enable-gd-native-ttf --with-openssl --with-mhash --enable-pcntl --enable-sockets --with-xmlrpc --enable-zip --enable-soap --without-pear --with-gettext --with-mime-magic
// 编译时间可能有点长。。。
// 编译成功后,安装
[root@pangou php-5.4.14]# make && make install
// 安装时间也比较长
安装成功后,php的位置就应该在/opt/php目录下,接下去就是配置
// 复制配置文件到配置目录下
[root@pangou php-5.4.14]# cp /root/Downloads/php/php-5.4.14/php.ini-production /opt/php/etc/php.ini
[root@pangou php-5.4.14]# cp /opt/php/etc/php-fpm.conf.default /opt/php/etc/php-fpm.conf
[root@pangou php-5.4.14]# cd /opt/php/etc/
[root@pangou etc]# ls
php-fpm.conf php-fpm.conf.default php.ini
// 然后配置nginx的配置文件,让其可以运行php
[root@pangou etc]# cd /opt/nginx/conf/
[root@pangou conf]# ls
fastcgi.conf fastcgi_params koi-utf mime.types nginx.conf scgi_params uwsgi_params win-utf
fastcgi.conf.default fastcgi_params.default koi-win mime.types.default nginx.conf.default scgi_params.default uwsgi_params.default
[root@pangou conf]# vim nginx.conf
1、去掉 #user nobody; 的#号, 变成 user nobody;
2、去掉
#location ~ \.php$ {
# root html;
# fastcgi_pass 127.0.0.1:9000;
# fastcgi_index index.php;
# fastcgi_param SCRIPT_FILENAME /scripts$fastcgi_script_name;
# include fastcgi_params;
#}
之前的#号,
并修改
fastcgi_param SCRIPT_FILENAME /scripts$fastcgi_script_name;
为
[/cfastcgi_param SCRIPT_FILENAME /opt/nginx/html$fastcgi_script_name;
ode]
最终修改后的内容为:
[code]
location ~ \.php$ {
root html;
fastcgi_pass 127.0.0.1:9000;
fastcgi_index index.php;
fastcgi_param SCRIPT_FILENAME /opt/nginx/html$fastcgi_script_name;
include fastcgi_params;
}
重启nginx服务,并开启php-fpm
[root@pangou ~]# /opt/nginx/sbin/nginx
[root@pangou ~]# /opt/php/sbin/php-fpm
// 创建phpinfo文件
[root@pangou ~]# vim /opt/nginx/html/phpinfo.php
内容为
<?php
phpinfo();
?>
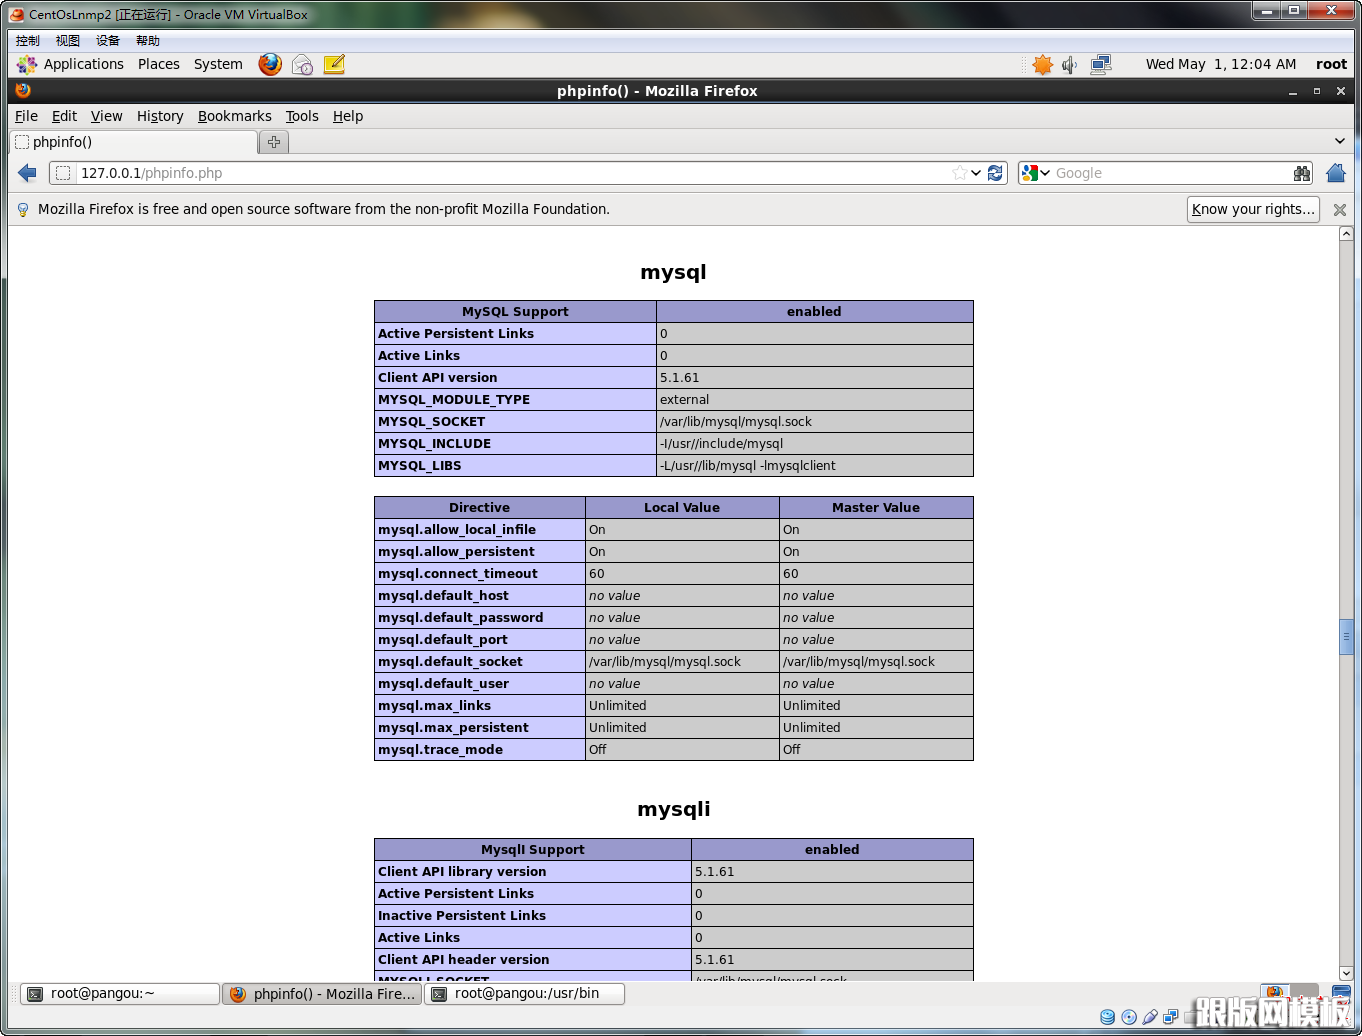
访问http://127.0.0.1/phpinfo.php

安装成功。mysql,mysqli等扩展都有。
这边有一点偷懒,并没有编译安装mysql,而是使用yum安装的mysql。
